QVBoxLayout
1
2
3
4
5
6
7
8
9
10
11
12
13
14
15
16
17
18
19
20
21
22
23
24
25
26
27
28
29
30
31
32
33
34
35
36
37
38
39
40
41
42
43
44
45
46
47
48
49
50
51
52
53
54
55
56
57
58
59
60
61
62
63
64
# Demonstrate how to stack widgets vertically
# using QVBoxLayout.
# QVBoxLayout stands for 'vertical box layout object'

import sys

from PySide6.QtCore import Slot
from PySide6.QtWidgets import (QApplication,
    QWidget, QPushButton, QVBoxLayout, QSizePolicy)


class Window(QWidget):

    def __init__(self):

        super().__init__()

        # 1 - Create the layout object
        #     and set it as our window layout

        layout = QVBoxLayout()
        self.setLayout(layout)

        # 2 - Create widgets

        button_1 = QPushButton('Button 1')
        # button_1.setSizePolicy( QSizePolicy.Expanding, QSizePolicy.Expanding)
        button_2 = QPushButton('Button 2')
        button_3 = QPushButton('Button 3')

        # 3 - Add widgets to the layout

        layout.addWidget(button_1)
        layout.addWidget(button_2)
        layout.addWidget(button_3)

        layout.addStretch()

        # Handle button events for demonstration purposes
        # Note how I reused the same method (on_button_clicked)
        # as the slot for all three button widgets.

        button_1.clicked.connect(self.on_button_clicked)
        button_2.clicked.connect(self.on_button_clicked)
        button_3.clicked.connect(self.on_button_clicked)

    @Slot()
    def on_button_clicked(self):

        # Inside the slot use self.sender()
        # to check which button was clicked:

        print(self.sender().text() + ' clicked.')


if __name__ == '__main__':

    app = QApplication(sys.argv)

    main_window = Window()
    main_window.show()

    sys.exit(app.exec())
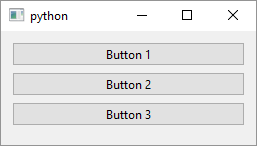
QVBoxLayout lines up widgets in a column. If you go to the previous link and follow the inheritance chain you’ll notice that QWidget is not one of the QVBoxLayout’s parent classes - this means you can not show() it on the screen like QWidget child classes. To add a vertical layout to your QWidget
-
Create a new
QVBoxLayoutobject and use theQWidget.setLayout()method to set it as your widget layout. This works forQWidgetsubclasses as well asQWidgets that are not top level windows. You can also have layouts within another layout. -
Create widgets you want to lay out. In this example I created three
QPushButtons -
Add your widgets to the layout using
QVBoxLayout.addWidget(). If you want to have an inner layout useQVBoxLayout.addLayout()instead.
If you run the script and resize the window with your mouse you’ll notice that the layout will resize with it but the buttons will only resize horizontally, keeping their height constant. There are two ways you can change this: If you add stretchable space after the widgets (using layout.addStretch()) it will stretch and keep the buttons neatly lined up. If you want a child widget to change its size with the layout set its size policy to Expanding (eg. button_1.setSizePolicy(QSizePolicy.Expanding, QSizePolicy.Expanding))
Another thing to note in the above script is that I connected all three QPushButtons’ clicked signal to a single slot named on_button_clicked. If you do that you can tell which button was clicked using QObject.sender() but remember the following warning (copied from the documentation):
Warning: This function violates the object-oriented principle of modularity. However, getting access to the sender might be useful when many signals are connected to a single slot.