QHBoxLayout
1
2
3
4
5
6
7
8
9
10
11
12
13
14
15
16
17
18
19
20
21
22
23
24
25
26
27
28
29
30
31
32
33
34
35
36
37
38
39
40
41
42
43
44
45
46
47
48
49
50
51
52
53
54
55
56
57
58
59
60
61
62
63
64
# QHBoxLayout is the horizontal box layout
# It lines out widgets horizontally
import sys
from PySide6.QtWidgets import (QApplication,
QWidget, QPushButton, QLabel, QHBoxLayout)
from PySide6.QtCore import QTime
class Window(QWidget):
def __init__(self):
super().__init__()
# The steps are the same as for the vertical box layout:
# 1 - Create the layout and set it as the window layout
layout = QHBoxLayout()
self.setLayout(layout)
# 2 - Create some widgets
# I add a button and a label for variety purposes
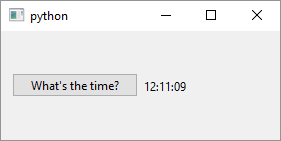
button = QPushButton("What's the time?")
self.label = QLabel('')
self.label.setMinimumWidth(60)
# I need to access the label from the
# slot method (ie. on_button_clicked)
# so I make it a Window instance variable.
# I also set the label minimum width
# 3 - Add widgets to the layout
layout.addWidget(button)
layout.addWidget(self.label)
# connect button.clicked to a slot
# to check if everything works
button.clicked.connect(self.on_button_clicked)
def on_button_clicked(self):
# You can use the QtCore.QTime class
# to get the current time
self.label.setText(QTime.currentTime().toString('hh:mm:ss'))
if __name__ == '__main__':
app = QApplication(sys.argv)
main_window = Window()
main_window.show()
sys.exit(app.exec())
QHBoxLayout lines up its child widgets horizontally. The steps to use it in your application are the same as for QVBoxLayout but here they are anyway:
-
Create the layout and set it as a
QWidget’s layout usingQWidget.setLayout() -
Create child widgets. In this example we create a
QPushButtonand aQLabel. We also set theQLabelminimum width to accommodate for the width of the text it will hold. -
Add the widgets and add them to the layout using
QHBoxLayout.addWidget()in order you want them to appear in the layout.
We also add some interactivity to the window by handling the QPushButton’s click events and set QLabel’s text to the time the button was clicked. This brings us to an important point: Qt is more than a GUI framework - it is packed with features that you could use in a non-GUI application. But so is Python, the ‘batteries included’ programming language, which leads to duplication of functionality, and it’s up to the developer to decide whether to use eg. Python’s time, Qt’s QTime or something entirely different.
Here are a few Qt classes from the QtCore namespace just to get the taste of what is available:
QCalendarQDateQDateTimeQDirQFileQFileSystemWatcherQJsonDocumentQJsonObjectQRandomGeneratorQRegularExpressionQSettingsQStandardPathsQStorageInfoQSysInfoQTextStreamQThreadQTimeQUrlQUuidQXmlStreamReaderQXmlStreamWriter