QTableWidget

1
2
3
4
5
6
7
8
9
10
11
12
13
14
15
16
17
18
19
20
21
22
23
24
25
26
27
28
29
30
31
32
33
34
35
36
37
38
39
40
41
42
43
44
45
46
47
48
49
50
51
52
53
54
55
56
57
58
59
60
61
62
63
64
65
66
67
68
69
70
71
72
73
74
75
76
77
# The QTableWidget class provides an
# item-based table view with a default model.
#
# Simply put, it's a table.

import sys
from random import randint

from PySide6.QtCore import Slot, Qt
from PySide6.QtWidgets import (QApplication, QWidget, QVBoxLayout,
    QTableWidget, QTableWidgetItem, QHeaderView, QLabel)


class Window(QWidget):

    def __init__(self):

        super().__init__()

        layout = QVBoxLayout()
        self.setLayout(layout)

        # 1 - Create the table widget passing row and column
        #     count to the constructor.
        #     This table widget has three rows and four columns
        self.table_widget = QTableWidget(3, 4)

        # Fit columns to table width
        self.table_widget.horizontalHeader().setSectionResizeMode(
            QHeaderView.ResizeMode.Stretch)

        # 2 - Use QTableWidgetItem instances
        #     to manipulate table cells

        # Fill the cells with some data
        for r in range(self.table_widget.rowCount()):
            for c in range(self.table_widget.columnCount()):
                value = randint(0, 100)
                item = QTableWidgetItem()
                item.setData(Qt.ItemDataRole.DisplayRole, value)
                item.setTextAlignment(Qt.AlignmentFlag.AlignCenter)
                self.table_widget.setItem(r, c, item)

        self.table_widget.currentItemChanged.connect(
            self.on_current_item_changed)

        self.table_widget.itemChanged.connect(self.on_item_changed)

        self.label = QLabel()
        self.label.setAlignment(Qt.AlignmentFlag.AlignCenter)

        layout.addWidget(self.table_widget)
        layout.addWidget(self.label)

    # 3 - Handle table widget signals
    #     table selection changes:
    @Slot()
    def on_current_item_changed(self, current, previous):
        # You have references to current and previously selected
        # table cells. previous can be None!
        self.label.setText(f'Selected cell value: {current.text()}')

    #     item value changes:
    @Slot()
    def on_item_changed(self, item):
        self.label.setText(f'Cell value has changed: {item.text()}')


if __name__ == '__main__':

    app = QApplication(sys.argv)

    main_window = Window()
    main_window.show()

    sys.exit(app.exec())
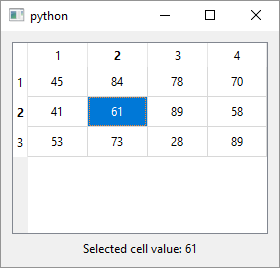
The QTableWidget class provides an item-based table view with a default model. Simply put, it’s a table. To use it in your application
-
Create a
QTableWidgetinstance and set the table dimensions. The table in the example has three rows and four columns. We also add aQLabelto the window. -
Fill the table cells with data. Each table cell is represented with a
QTableWidgetIteminstance so we use a nested loop to create3 * 4 = 12QTableWidgetIteminstances. We set each item’s data to a random integer usingQTableWidgetItem.setData().data()is aQVariantso you can set it to other common data types as well. After that eachQTableWidgetItemis assigned to a table cell usingQTableWidget.setItem(row, column, item) -
Create two slot methods to create two
QTableWidgetsignals:currentItemChangedanditemChanged. The first signal is emitted when the current item changes and the slot sets the label’s text to the current item’s text. The second signal is emitted when an item’s value changed. OurQTableWidgetis editable and if you double-click on a cell, change its value and press Enter, the label’s text is updated accordingly. Note that when you double-click on a cell to enter its edit mode Qt recognizes the value as an integer and adds a spin box to the cell.