QGridLayout
1
2
3
4
5
6
7
8
9
10
11
12
13
14
15
16
17
18
19
20
21
22
23
24
25
26
27
28
29
30
31
32
33
34
35
36
37
38
39
40
41
42
43
44
45
46
47
48
49
50
51
52
53
54
55
56
57
58
59
60
61
62
63
64
# QGridLayout lays out widgets, well, in a grid

import sys

from PySide6.QtCore import Slot
from PySide6.QtWidgets import (QApplication,
    QWidget, QPushButton, QLabel, QGridLayout)


class Window(QWidget):

    def __init__(self):

        super().__init__()

        # 1 - Create the layout:

        layout = QGridLayout()
        self.setLayout(layout)

        # 2 - Create widgets and add them to the grid
        # We create sixteen buttons in a 4x4 grid
        # (0, 0) is the top left cell
        # The first integer is the row number
        # The second integer is the column number

        for r in range(4):
            for c in range(4):

                button = QPushButton(f'Button {r}, {c}')
                button.clicked.connect(self.on_button_clicked)
                self.layout().addWidget(button, r, c)

        # The label is put in row 4, column 0
        # and spans one row and four columns.

        self.label = QLabel()

        layout.addWidget(self.label, 4, 0, 1, 4)

    # The slot method

    @Slot()
    def on_button_clicked(self):

        # Get a reference to the clicked button
        # and its position in the grid view

        clicked_button = self.sender()

        index = self.layout().indexOf(clicked_button)
        position = self.layout().getItemPosition(index)
        r, c, _, _ = position
        self.label.setText(f'Row: {r}, Column: {c}')


if __name__ == '__main__':

    app = QApplication(sys.argv)

    main_window = Window()
    main_window.show()

    sys.exit(app.exec())
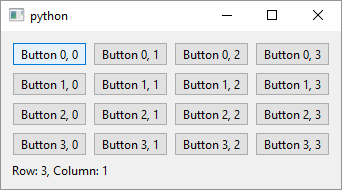
QGridLayout lays out widgets, well, in a grid. Unlike with QVBoxLayout and QHBoxLayout you need to specify the QWidget’s position (ie. row and column) when adding it to the grid. To use QGridLayout in your application:
-
Create a
QGridLayoutinstance and set it as yourQWidgetlayout -
Create the widgets and add them to the layout using
QGridLayout.addWidget(). When adding them you need to specify the widget’s position (ie.its row and column) which means you can leave some grid cells empty.In addition, you can specify how many rows and columns the widget will span eg. if you uselayout.addWidget(self.label, 4, 0, 1, 4)andself.labelwill span one row and four columns.
In this script we fill the grid layout with sixteen QPushButtons, in four rows and four columns, and use a single Slot to handle all buttons’ signals. The buttons are added dynamically, using two for loops, and we never keep a reference to any of them. It is still possible to get a reference to the button that was clicked using QObject.sender() and getting the sender’s position is possible if a bit involved.