QTableView

1
2
3
4
5
6
7
8
9
10
11
12
13
14
15
16
17
18
19
20
21
22
23
24
25
26
27
28
29
30
31
32
33
34
35
36
37
38
39
40
41
42
43
44
45
46
47
48
49
50
51
52
53
54
55
56
57
58
59
60
61
62
63
64
65
66
67
68
69
70
71
72
73
74
75
76
77
78
79
80
81
82
83
84
85
86
87
# The QTableView class provides a default model/view
# implementation of a table view.
# Just as with QListView you need to provide the model yourself

import sys

from PySide6.QtCore import Qt
from PySide6.QtSql import QSqlDatabase, QSqlQuery, QSqlQueryModel
from PySide6.QtWidgets import (QApplication,
    QWidget, QVBoxLayout, QTableView, QHeaderView)


class Window(QWidget):

    def __init__(self):

        super().__init__()

        layout = QVBoxLayout()
        self.setLayout(layout)

        # 1 - Create the table view

        table_view = QTableView()

        # 2 - Create the model instance

        # Set up the model data for the example

        database = QSqlDatabase.addDatabase('QSQLITE')
        database.setDatabaseName(':memory:')
        database.open()
        self.set_up_data()

        self.model = QSqlQueryModel()
        self.model.setQuery('Select * From users')
        self.model.setHeaderData(0, Qt.Horizontal, 'Id')
        self.model.setHeaderData(1, Qt.Horizontal, 'First Name')
        self.model.setHeaderData(2, Qt.Horizontal, 'Last Name')
        self.model.setHeaderData(3, Qt.Horizontal, 'Age')

        # 3 - Set it as the table view model.

        table_view.setModel(self.model)

        # Make the columns and rows fit the table view
        # size so there's no scrollbars

        table_view.horizontalHeader().setSectionResizeMode(
            QHeaderView.ResizeMode.Stretch)

        table_view.verticalHeader().setSectionResizeMode(
            QHeaderView.ResizeMode.Stretch)

        layout.addWidget(table_view)

    def set_up_data(self):

        # Create a table and fill it with some data

        query = QSqlQuery()
        query.exec('''
        Create Table users (
        id Integer Primary Key,
        fname Text Not Null,
        lname Text Not Null,
        age Integer Not Null)
        ''')

        query.exec('''
        Insert Into users (fname, lname, age)
        Values
        ('Alice', 'Carol', 32),
        ('Bob', 'Rock', 28),
        ('Chuck', 'Moore', 23)
        ''')


if __name__ == '__main__':

    app = QApplication(sys.argv)

    main_window = Window()
    main_window.show()

    sys.exit(app.exec())
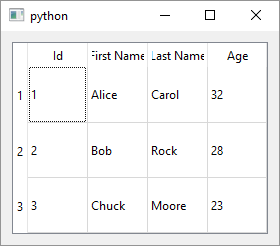
QTableView is another one of the Qt view classes and, just as QListWidget is a subclass of QListView, QTableWidget is a subclass of QTableView. To use it in your application
-
Create a
QTableViewinstance -
Create a model instance. In the example we use
QSqlQueryModel, a model provided by Qt that is suitable for use withQTableViewbut we could have usedQSqlTableModelorQSqlRelationalTableModelas well. For the purpose of the example we set up an in-memory SQLite database with one table which we populate with sample data. -
Set the view’s model using
QTableView.setModel()
In this example we use the QSqlDatabase, QSqlQuery and QSqlQueryModel classes which are part of the QtSQL module. You might have noticed that QSqlQery and QSqlQueryModel both use SQL queries against our in-memory database but we don’t specify the database connection explicitly - they both use database implicitly as it is set as the default connection (but more on that later).
Also note that we didn’t make database a Window member (ie. we didn’t use self.database).